


Transferring Your Audio Recordings To Your Computer
![]()
This is going to be a real quick guide to show you how to transfer your audio files from your recorder to your computer. If your recorder has a USB interface, then you’re good to go but, a lot of recorders don’t have their own USB connectors, so instead, you’re going to have to use headphone cable.
Unfortunately, Windows Sound Recorder sucks ass, so you want to make sure that you have a good program that you can record to. I suggest Audacity. Because it’s free, and easy to use, I’ll be using Audacity for this tutorial. If you do not have Audacity, you can download it HERE free of charge.
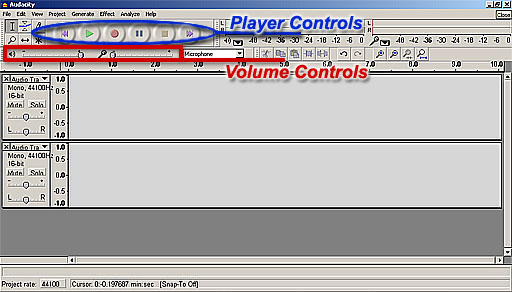
Above, you’ll see exactly what Audacity looks like when you open the program. I’ve circled the two most important functions for this tutorial, the player controls, and the volume controls.
When you open the Audacity program, you’ll find that the controls that we’ll be using works somewhat like a CD player. If you don’t know how to use a CD, or MP3 player then…well… You’re stupid.
Step 1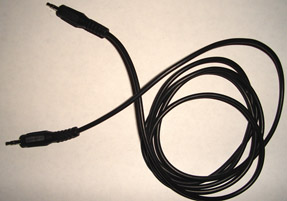
This is very simple. First, you have to make sure that you have your headphone cable. This can be bought where most audio equipment is sold. You’ll want to have one that has a plug on each end. For this type of thing, the standard size for each plug is 1/8 inch. If for some crazy reason 1/8 is to large or small, you can always buy an adapter to fit the size that you need. The cable usually runs about 5 bucks, and the adapter is usually less than that, if needed.
Step 2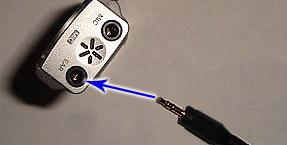
Plug one end of your headphone cable into the ‘earphone’ jack of your recorder. In the picture, I’ve used my digital recorder, but this works just as easily with a cassette tape recorder. As a matter of fact, ANYTHING with a working headphone jack will work with this tutorial.
Step 3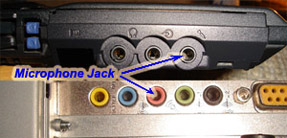
Plug the other end of your headphone cable into the microphone jack on your computer. I’ve pictured both a laptop and a desktop computer to show you what jacks to look for. There will usually be a little picture of a microphone next to the jack.
Step 4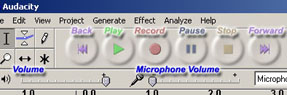
When you have both plugs connected to your computer and your recorder, you have to click ‘record’ on Audacity’s controls.
Step 5
Immediately after starting your recording on your computer, you have to press play on your recorder. I don’t have your recorder, so I can’t produce a picture of it to show you what button to press. Instead, here’s a picture of Animal.
Step 6
As you record, you’ll actually be able to see your audio showing up on the program in a wave form.
NOTE: Make sure that the volume on your recorder, and the microphone volume on Audacity is NOT too high. Your recording will sound distorted and nasty. Make sure you play around with it and find a good CLEAR volume in which to transfer.
Play, and record your audio until the end of the tape or file.
Step 7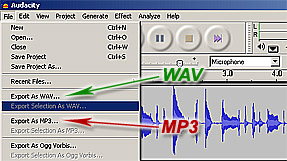
When your recording is completed, click stop on Audacity. To save the file, go to the top left corner of the program and click ‘file’. A menu will show up in which 2 of your options are, ‘Export As WAV’ and ‘Export As MP3’. It’s up to you what type of file you want to save it as. Once you choose, it will give you the opportunity to name your file and save it.
That’s all there is to it. I hope you found this little tutorial helpful. Next, we’ll talk about using computer software to clean and filter your recording!

Discussion ¬