


Cleaning Your E.V.P. With Adobe Audition

 You have some wav files on your computer, you have Adobe Audition, and you want to filter the noise, and other useless crap so you will have a clean finished product.
Audition, at first glance looks pretty complicated, but you’ll have this down pretty quickly. Trust me, it’s easy.
There are five basic things you should be familiar with when starting with Adobe Audition. They are the Spectral/Waveform Button, The Effects List, The Edit View, Basic Controls, and lastly the Zoom Controls. If you look at the picture below, I’ve taken a screen shot of a wav file opened up in Audition. The five functions that you need are circled.
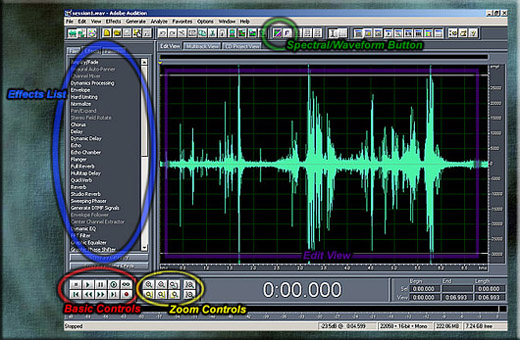
Basic Controls: I don’t mince words. If you don’t know the basic controls for a media player, you’re stupid. Seriously though, these are all you need to play and record on Adobe Audition. The top right button is also useful for ‘looping’ your recording.
Edit View: This is where you can actually ‘see’ your sound file, as well as decibel & hertz levels. It is also used to identify anomalies in the sound which I will explain shortly.
Zoom Controls: This one’s pretty easy to understand too. This just makes the image in the Edit View larger or smaller, or wider or thinner. If you zoom in and widen the image in the Edit View, it’s a lot easier to see an anomaly.
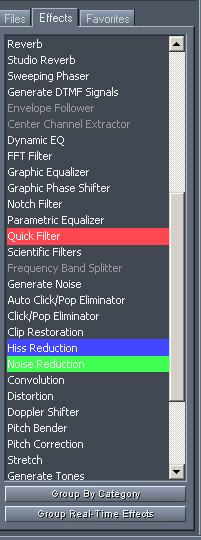
Effects List: There are a bunch of creative things that can be done with your sound file, most of which will be located within this list. For now we will be focusing on only 3 different effects. Noise Reduction, Hiss Reduction, and Quick Filter.
Spectral/Waveform Button: This button helps you identify anomalies in the Edit View by switching the Wave image in green to a pinkish Spectral image. I know, it sound’s goofy right now, but you’ll understand.
Identifying Anomalies
To Identify an anomaly within your sound file, the first thing you have to do is get rid of those green waves in the Edit View. I mean, you can strain your eyes, stare at the green crap all day, and find things, but it’s not necessary. All you have to do is hit the Spectral/ Waveform button.
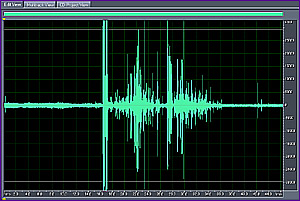
WAVEFORM
![]()
Spectral/Waveform Button
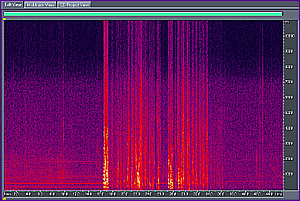
SPECTRAL
Now that you have converted your Edit View from Wave to Spectral, all you have to do is identify the anomalies. Its not hard to do, and after doing this a couple times you’ll develop an eye for it. It’s as simple as looking for something that you don’t recognize. Look at the picture below.

The brighter the color, the more powerful the sound. That’s all there is to know really. You see in the center of the image, it’s very brightly colored. I think that’s me yelling at my cat (or vice versa). You can tell that it’s loud. You can see that I circled a couple of things that were way to quiet to be anybody talking. We have no clue what those are. Those are the anomalies.
You’re going to want to play around with your Zoom Controls because, the more you widen the Edit View, and zoom in, the better you’ll be able to identify them.
Cutting & Saving Anomalies
The first thing you want to do is separate your anomaly from the original wave. The image above has the anomalies (circled) in the Edit view. I’ve also used Audition to highlight the area which has the anomalies. In the image, you’ll see the 2 versions of the same image switch back and forth.
 Once you’ve highlighted the section that you want to separate, all you have to do is go up to the top left corner of Audition. Click FILE, and then go to SAVE SELECTION…
Give it a name and save it. At that point you’ll want to open your new smaller file in Audition to start filtering it.
Filtering
There are three different ways to filter your sound file that I’m going to focus on here. I’ve highlighted all three in the Effects List to the left. You can use them as much, or as little as you want, and in any order to make your sound file sound more clear. Which ones you use, and how is all up to you. Here’s how you use each one.
Hiss Reduction: Hiss reduction Is the easiest to work with due to its three presets.
To keep it simple, all you have to do is choose one of the three presets that I’ve circled in the below image, and click OK. You can click ‘Preview’ to hear it before you make a decision, or play around with other more complicated settings to get the desired result.

Noise Reduction: When you click on this, the first thing that will happen is a box will appear. (Image on right) All you have to do there is click on the little button that I’ve circled in green that says ‘Capture Profile.’
After you click that button, you have the ability to change the ‘Noise Reduction Settings’ that I’ve squared off in blue on the image. There are many settings in here which you can change to filter your audio track. The main one you will be working with is the ‘Reduce By’ field. You’ll set it between 2 and 40dB. Play around and experiment a bit and you’ll figure out which settings work best for you.
When you’re done, just click OK and move on.

Quick Filter: To use Quick Filter, you must first zoom in on your anomaly, and see where it’s at its strongest.
The brighter the color, the stronger the audio. If you look at the image above, you’ll see the anomaly that I recorded. On the right of the image you’ll see numbers and lines, sort of like a ruler. That thing measures Hertz (Hz). So, you take the brightest color in your anomaly, and look to the right, and match up where it falls on the Hz scale. I apologize for the size of the image, but if you can see, you’ll see that my anomaly falls at right around 400Hz. Also, you might want to note that many investigators believe that most of the best E.V.P.’s are under 1000Hz.
After that, go to your Effects List and click “Quick Filter.” The image below is the box that will pop up with a bunch of sliders for you to adjust to change your sound file. You’ll notice that I slid them all the way down, all but one. The one that’s all the way up is marked 344. Why? Because my anomaly is close to 400Hz, and 344 is the closest one to 400. So, what I’ve done is amplify all sound in that Hz range, and silence all others.
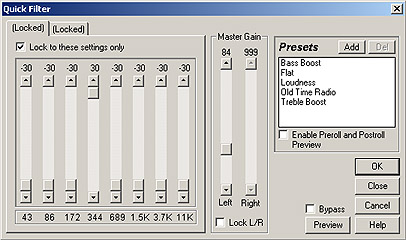
Click OK. That’s about it.
The Glorious Marquee Selection Tool
This one is my favorite, so I saved it for last. It’s also EXTREMELY easy to use.
The first thing that you have to do is make sure that you transform your Waveform to Spectral, like I’d shown you before.
The next thing you want to do is select your Marquee 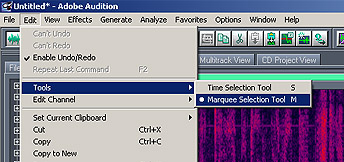 Selection Tool. There’s a button for it at the top of the program, but for this tutorial, it’s easier to go into the edit menu. Click ‘Edit’, go down to ‘Tools’ and select the ‘Marquee Selection Tool’. Once you’ve done that, your cursor should change to a ‘+’. Look at the image to the right for an example.
Below is an image of the ‘Edit View’ to show you exactly what needs done to use this tool. You’ll have this second nature immediately. It’s that simple. There’s only 2 steps to learn.
Step 1:
Use your cursor the same way that you would if you were highlighting multiple icons on your desktop. Click and drag to make a square. You can make it as large as I did, or you can just use it to select a tiny noise in the waveform that you don’t like.
Step 2:
Right click anywhere on your Edit View. In the little menu that pops up, click ‘Silence’. Everything that you highlighted is gone!
That’s it. It’s as simple as that. You can go through any file, and VISUALLY delete sounds from any frequency that you find to be hurting your finished product. You can do it on a large scale, like I had just shown you, or you can be meticulous, and go through every little annoying click or pop, or car driving by.
Have fun.
That’s all you have to do. I’ve tried to simplify it as much as possible to ensure that you’d pick it up easily. You can ALWAYS get more complicated with it as you go. Change your settings a bit and see what happens. Of course, this isn’t everything, but it’s a good start to get you going. I really hope that this has helped you.

Discussion ¬